 martinberger.swiss
Database Administrators often need to grant colleagues - developers, performance analysts, auditors - access to monitoring data without exposing any administrative capabilities. Oracle Enterprise Manager 24ai makes this possible through a layered approach: database-level permissions, named credentials, target groups, and private roles all work together to produce an account that can see everything but change nothing.
This post walks through the complete setup, using a nice guy user called Snoopy who needs read-only access to a single Container Database (and its Pluggable Databases) in the NOIT compartment.
Important: Creating roles and set target privileges are a co-working task. Talk with your colleagues about their needs and how they can get their required information in OEM.
The Big Picture
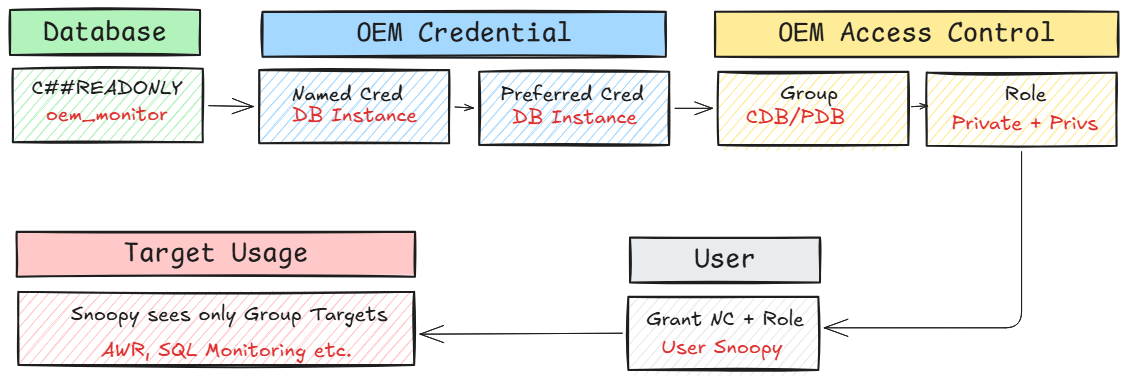
Top Line: Database layer
A common user C##READONLY is created in the CDB and granted the minimum privileges needed for OEM monitoring.
Bottom Line: OEM layer
A named credential, a target group, and a private role combine to control exactly which targets Snoopy can see and what actions the credential allows.
The database user controls what SQL operations are permitted; the OEM role controls which targets and actions are visible.
Step 1 — Create the read-only Database User
Connect to the Container Database SQL> as a privileged user and run:
CREATE USER C##READONLY IDENTIFIED BY "OraMy1Password-32" CONTAINER=ALL;
GRANT CONNECT, OEM_MONITOR TO "C##READONLY" CONTAINER=ALL;
The CONTAINER=ALL clause propagates the user and its grants into every Pluggable Database automatically. The OEM_MONITOR role is Oracle’s built-in grant for Enterprise Manager monitoring - it covers the data dictionary views needed for AWR snapshots, active session history, SQL statistics, and related diagnostics, while deliberately excluding any DDL or administrative privilege.
Step 2 — Create a Named Credential
In OEM, navigate to Setup → Security → Named Credentials and create a new credential of type Database Instance, scoped as Global.
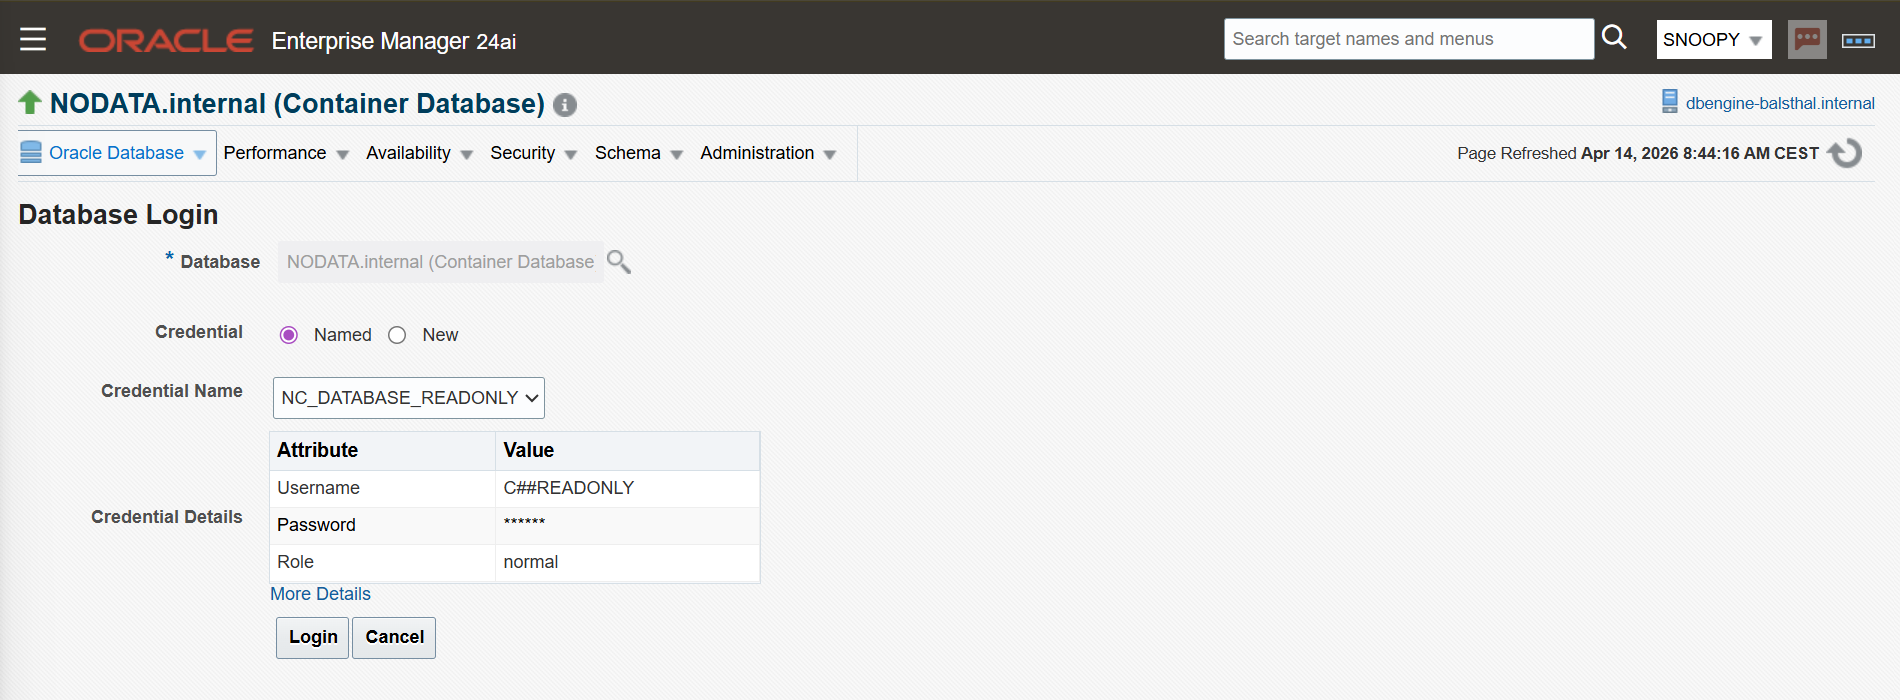
Add the C##READONLY username and password. Test the credential against a target database where the user exists. This named credential will be the bridge later on between OEM and the database — it is what Snoopy’s session will use when clicking into Performance Hub or SQL Monitoring pages. This is one of the things i like with Named Credentials, the user does not need to know the password to get access for deeper analysis.

Step 3 — Set the Preferred Credential on the Target
Preferred credentials tell OEM which credential to use by default when a user connects to a target. Navigate to Setup → Security → Preferred Credentials, select the Database Instance target type, and configure at the target level (not globally) under Target Preferred Credentials → Normal Database Credentials.
Setting this at the target level rather than globally keeps the scope tight: only the NODATA.internal database uses this credential by default. When Snoopy opens Performance Hub or SQL Monitoring, OEM automatically presents the named credential without requiring manual selection.
Tip: If you are logged in to OEM as SYSMAN while testing, log out from the target first. SYSMAN’s own credentials can mask whether the preferred credential is working correctly.

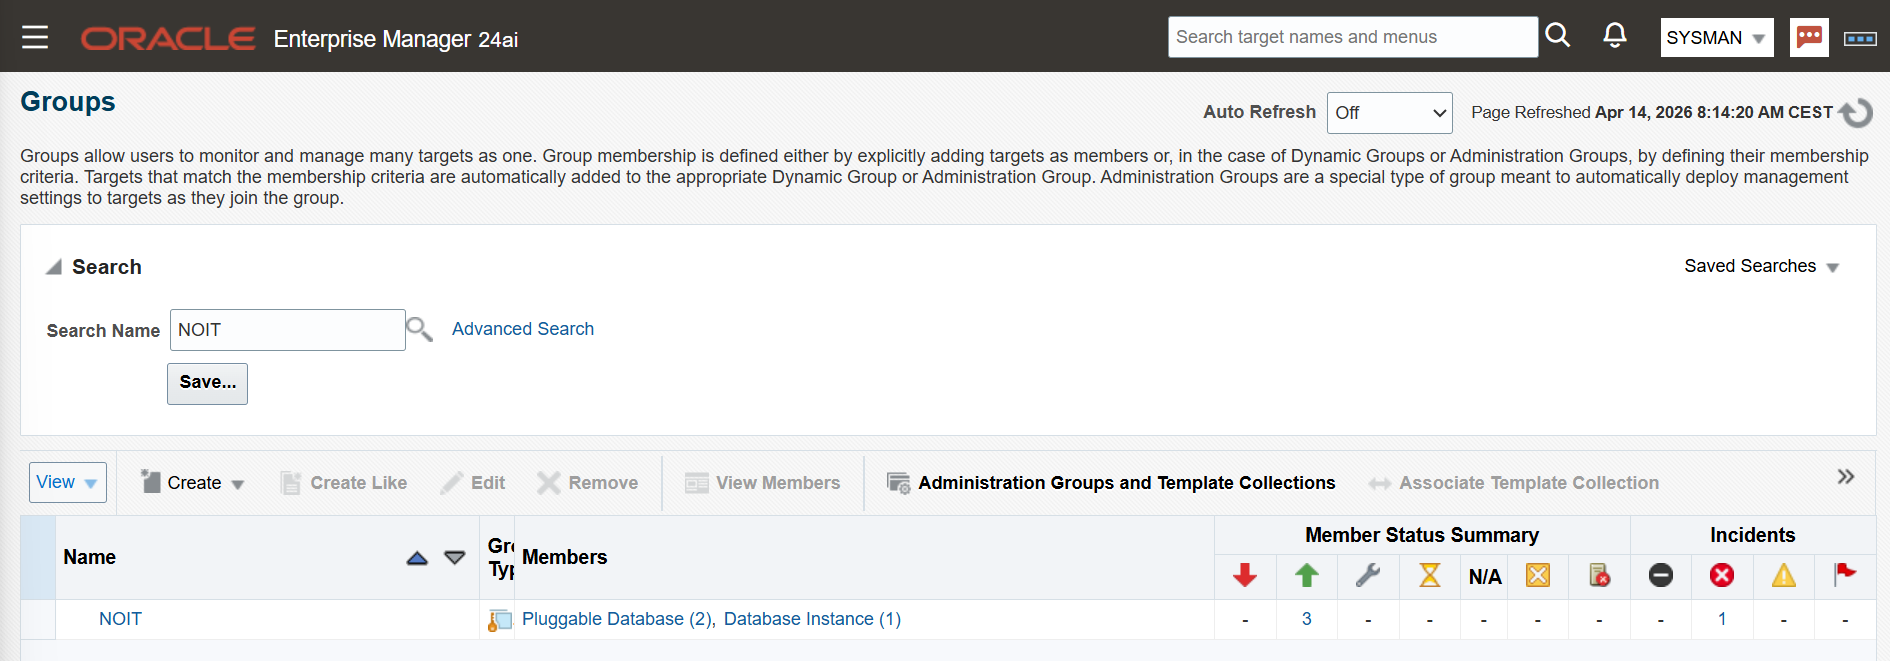
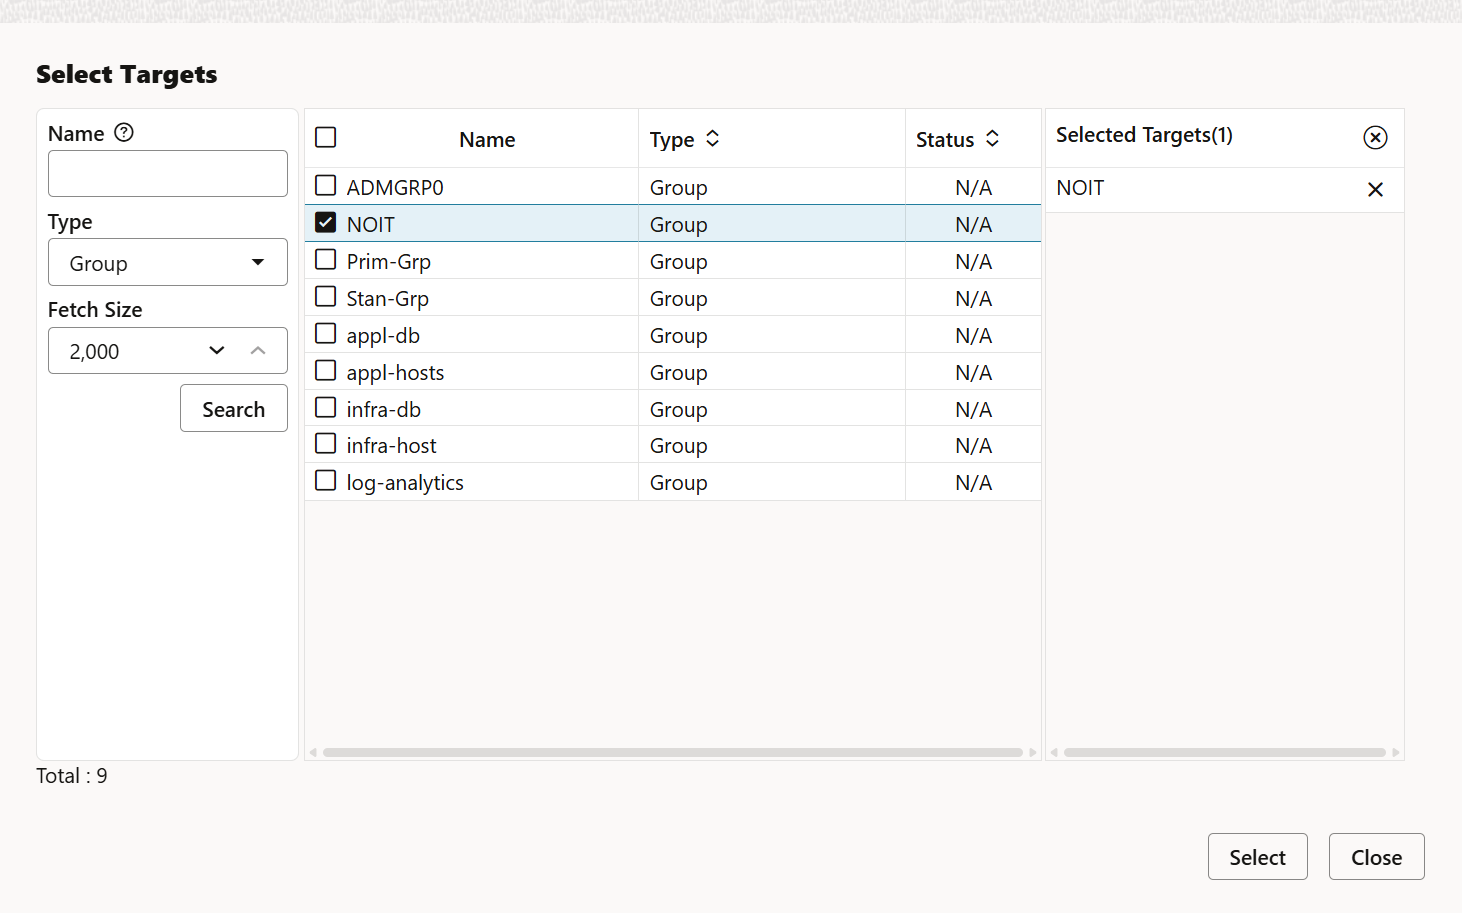
Step 4 — Create a Target Group
Navigate to Targets → Groups and create a new group. Add the Container Database and its associated Pluggable Databases as members.
The critical checkbox here is Privilege Delegation Enabled. Without it, role-based target privileges cannot be delegated to users, and the access control model breaks down. The group is the unit of visibility in OEM.Snoopy will only ever see targets added to this group.
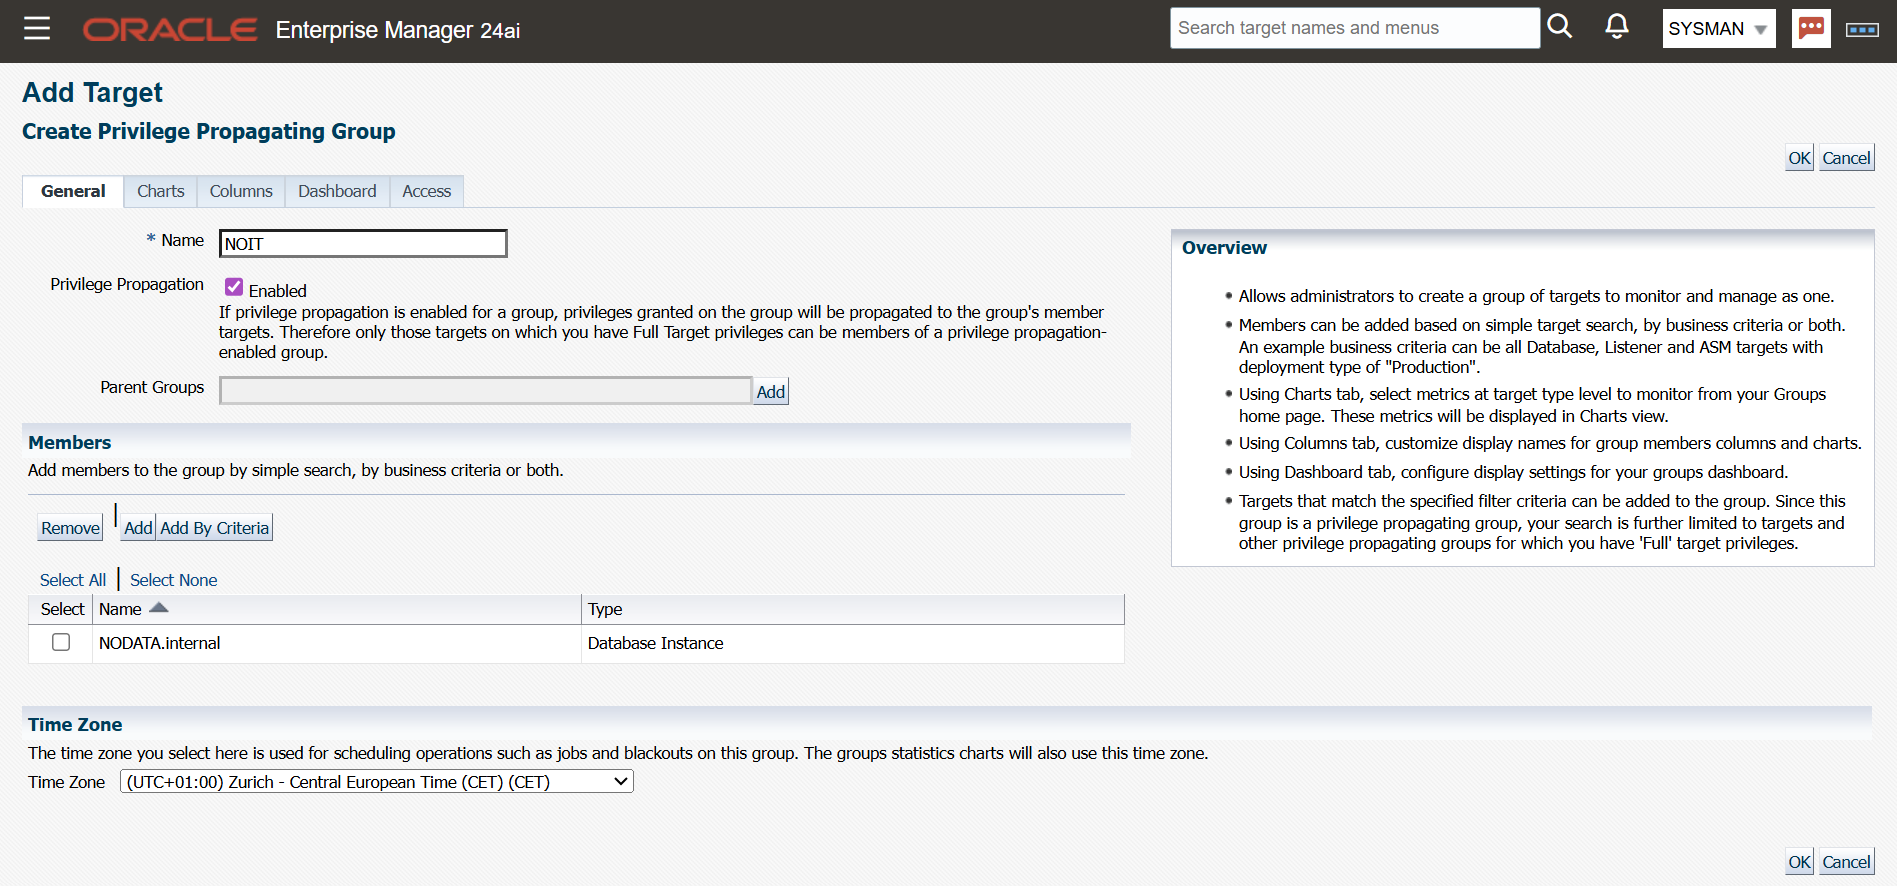
Groups are the way to set specific permmissions to targets. Verify database instance and containing pluggable databases are added.
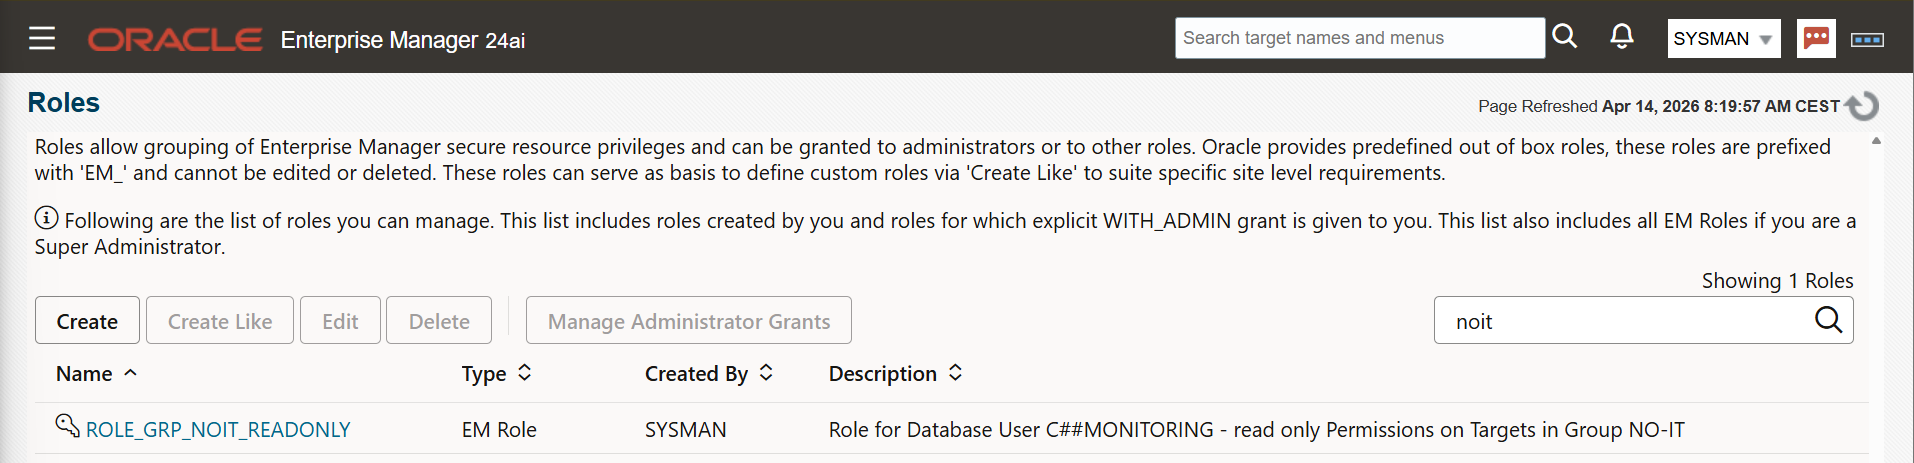
Step 5 — Create a Private Role
Navigate to Setup → Security → Roles and create a new role. Two settings define its behaviour:
- General tab: Enable Private Role. This is non-negotiable. Named credentials can only be granted to private roles; if this option is not set, the credential grant in the next step will not work.
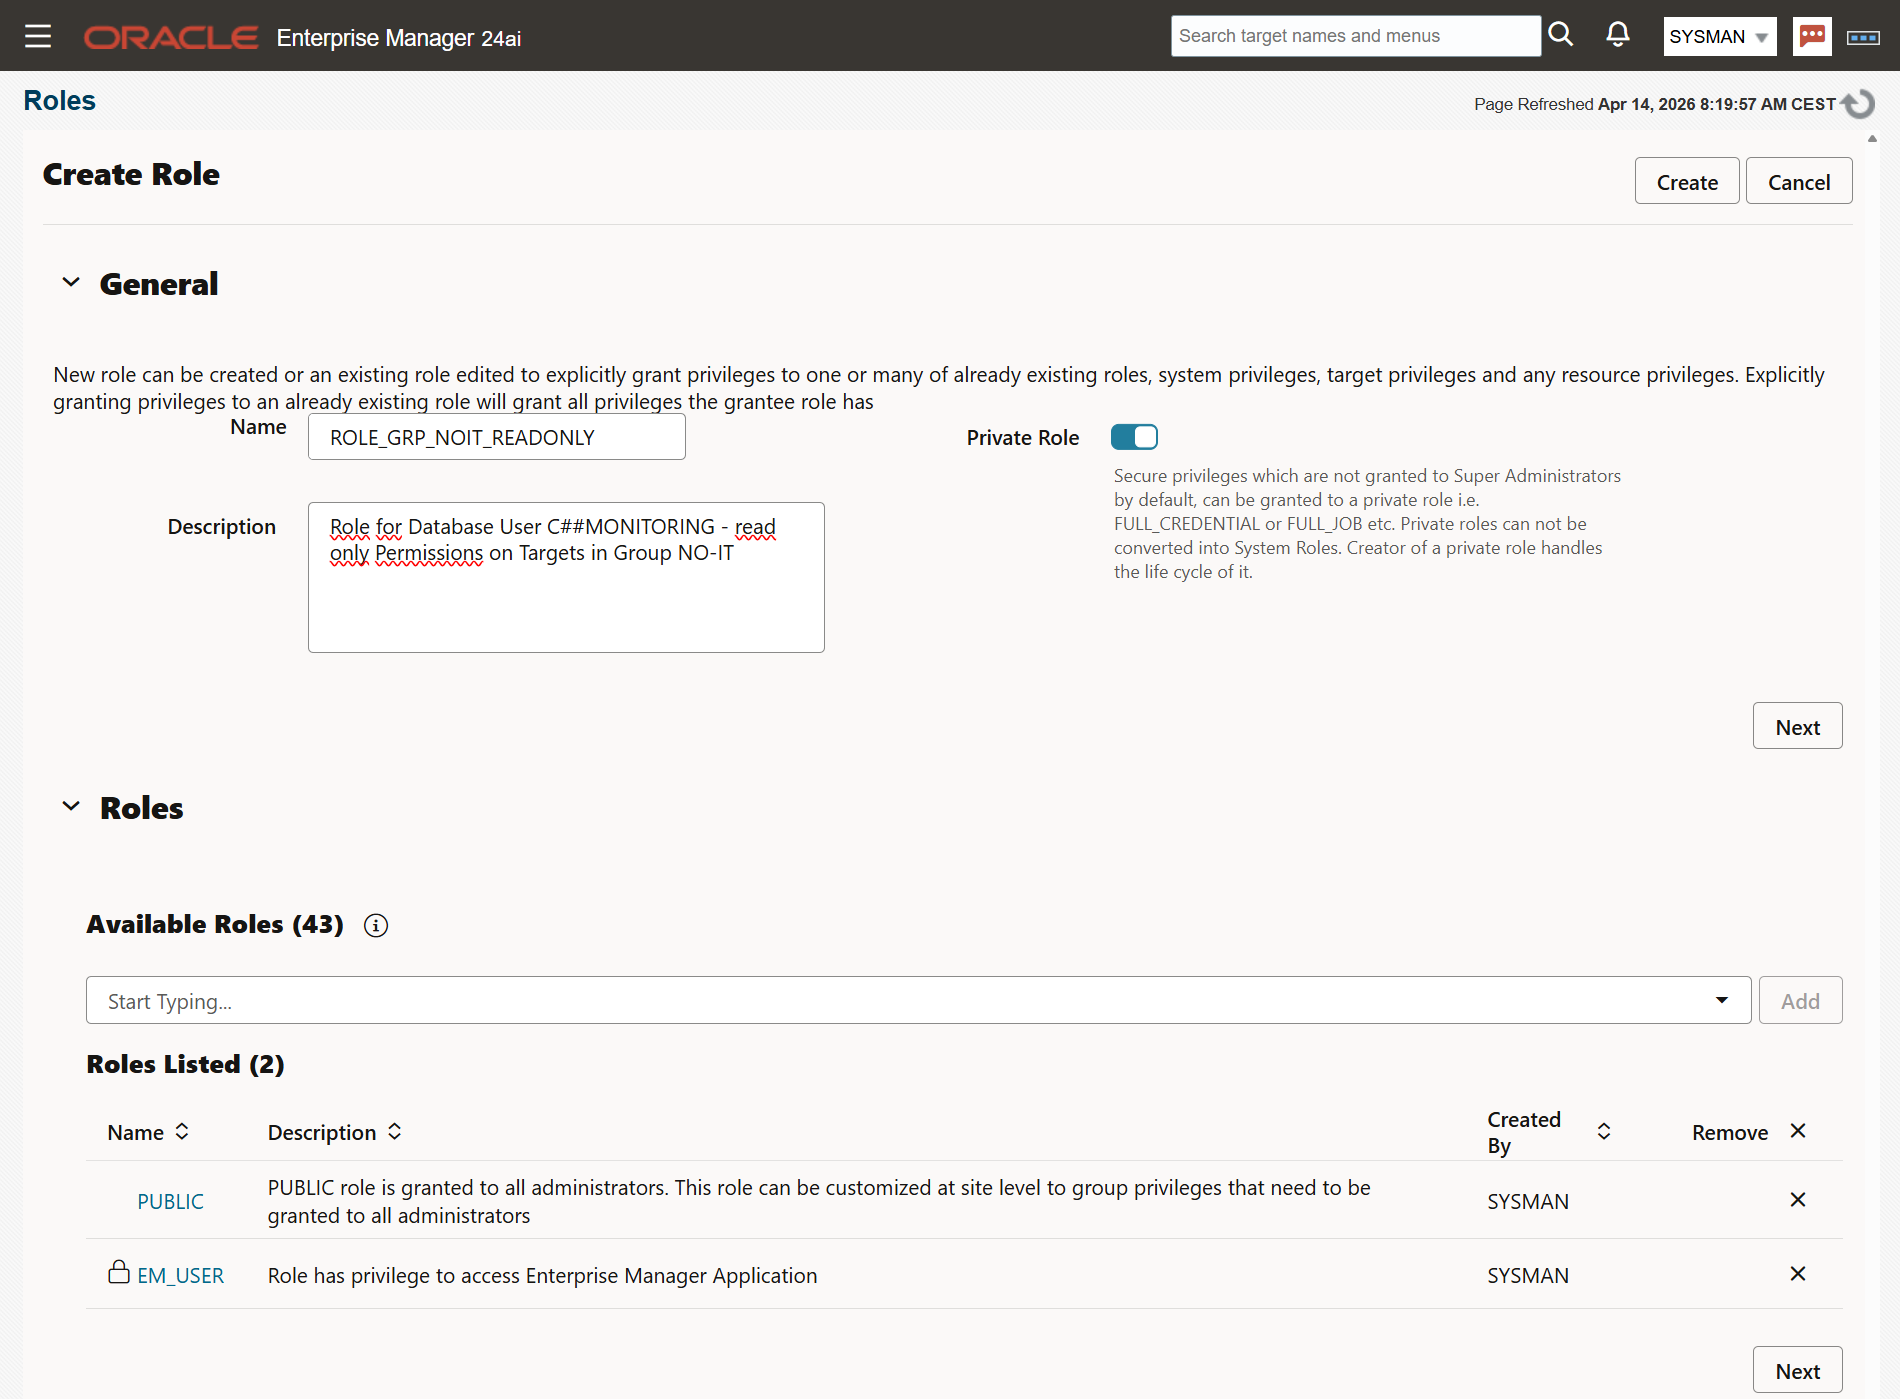
- Roles tab: Add EM_USER and PUBLIC. These provide the baseline OEM UI permissions a monitoring user needs.
Target Privileges tab: Select the group created in Step 4 (type: Group, not Database Group). Click the pencil icon in the Privilege Name column and assign the four standard monitoring privileges. These can be adjusted at any time without recreating the role.
OEM provides a lot of target privileges, it depends what your users want to achive. Privileges can added and removed at any time. We start with these two target instance privileges:
- View Database Tablespaces
- View Database Performance Privilege Group
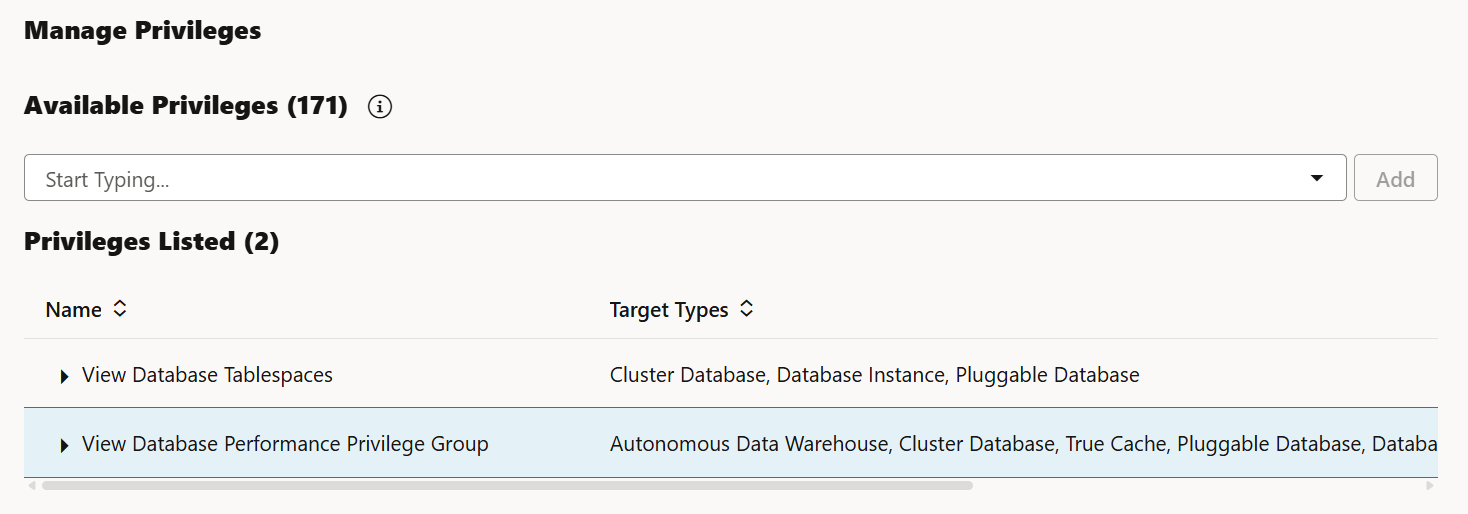
Press Create to save the new role.
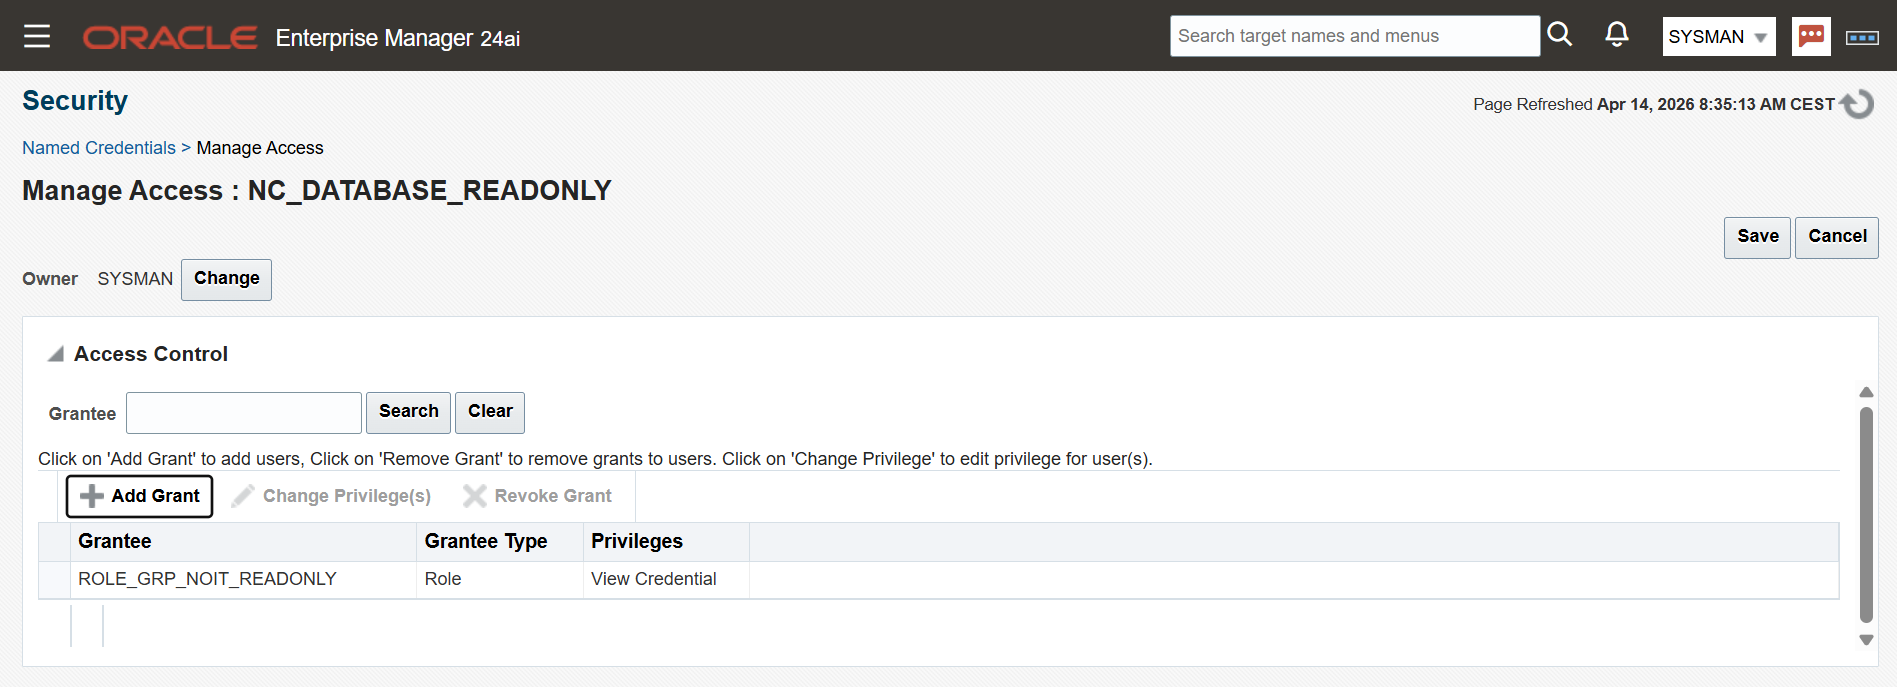
Step 6 — Grant the Named Credential to the Role
Return to Setup → Security → Named Credentials, locate the credential created in Step 2, and open Manage Access. Add the private role and save.
This is the step that wires everything together: the role now carries both the target visibility (via the group) and the credential (via the grant), so any user assigned this role automatically inherits both.
If the role does not appear in the list here, it means the Private Role checkbox was not set. Go back to the role definition and correct it.
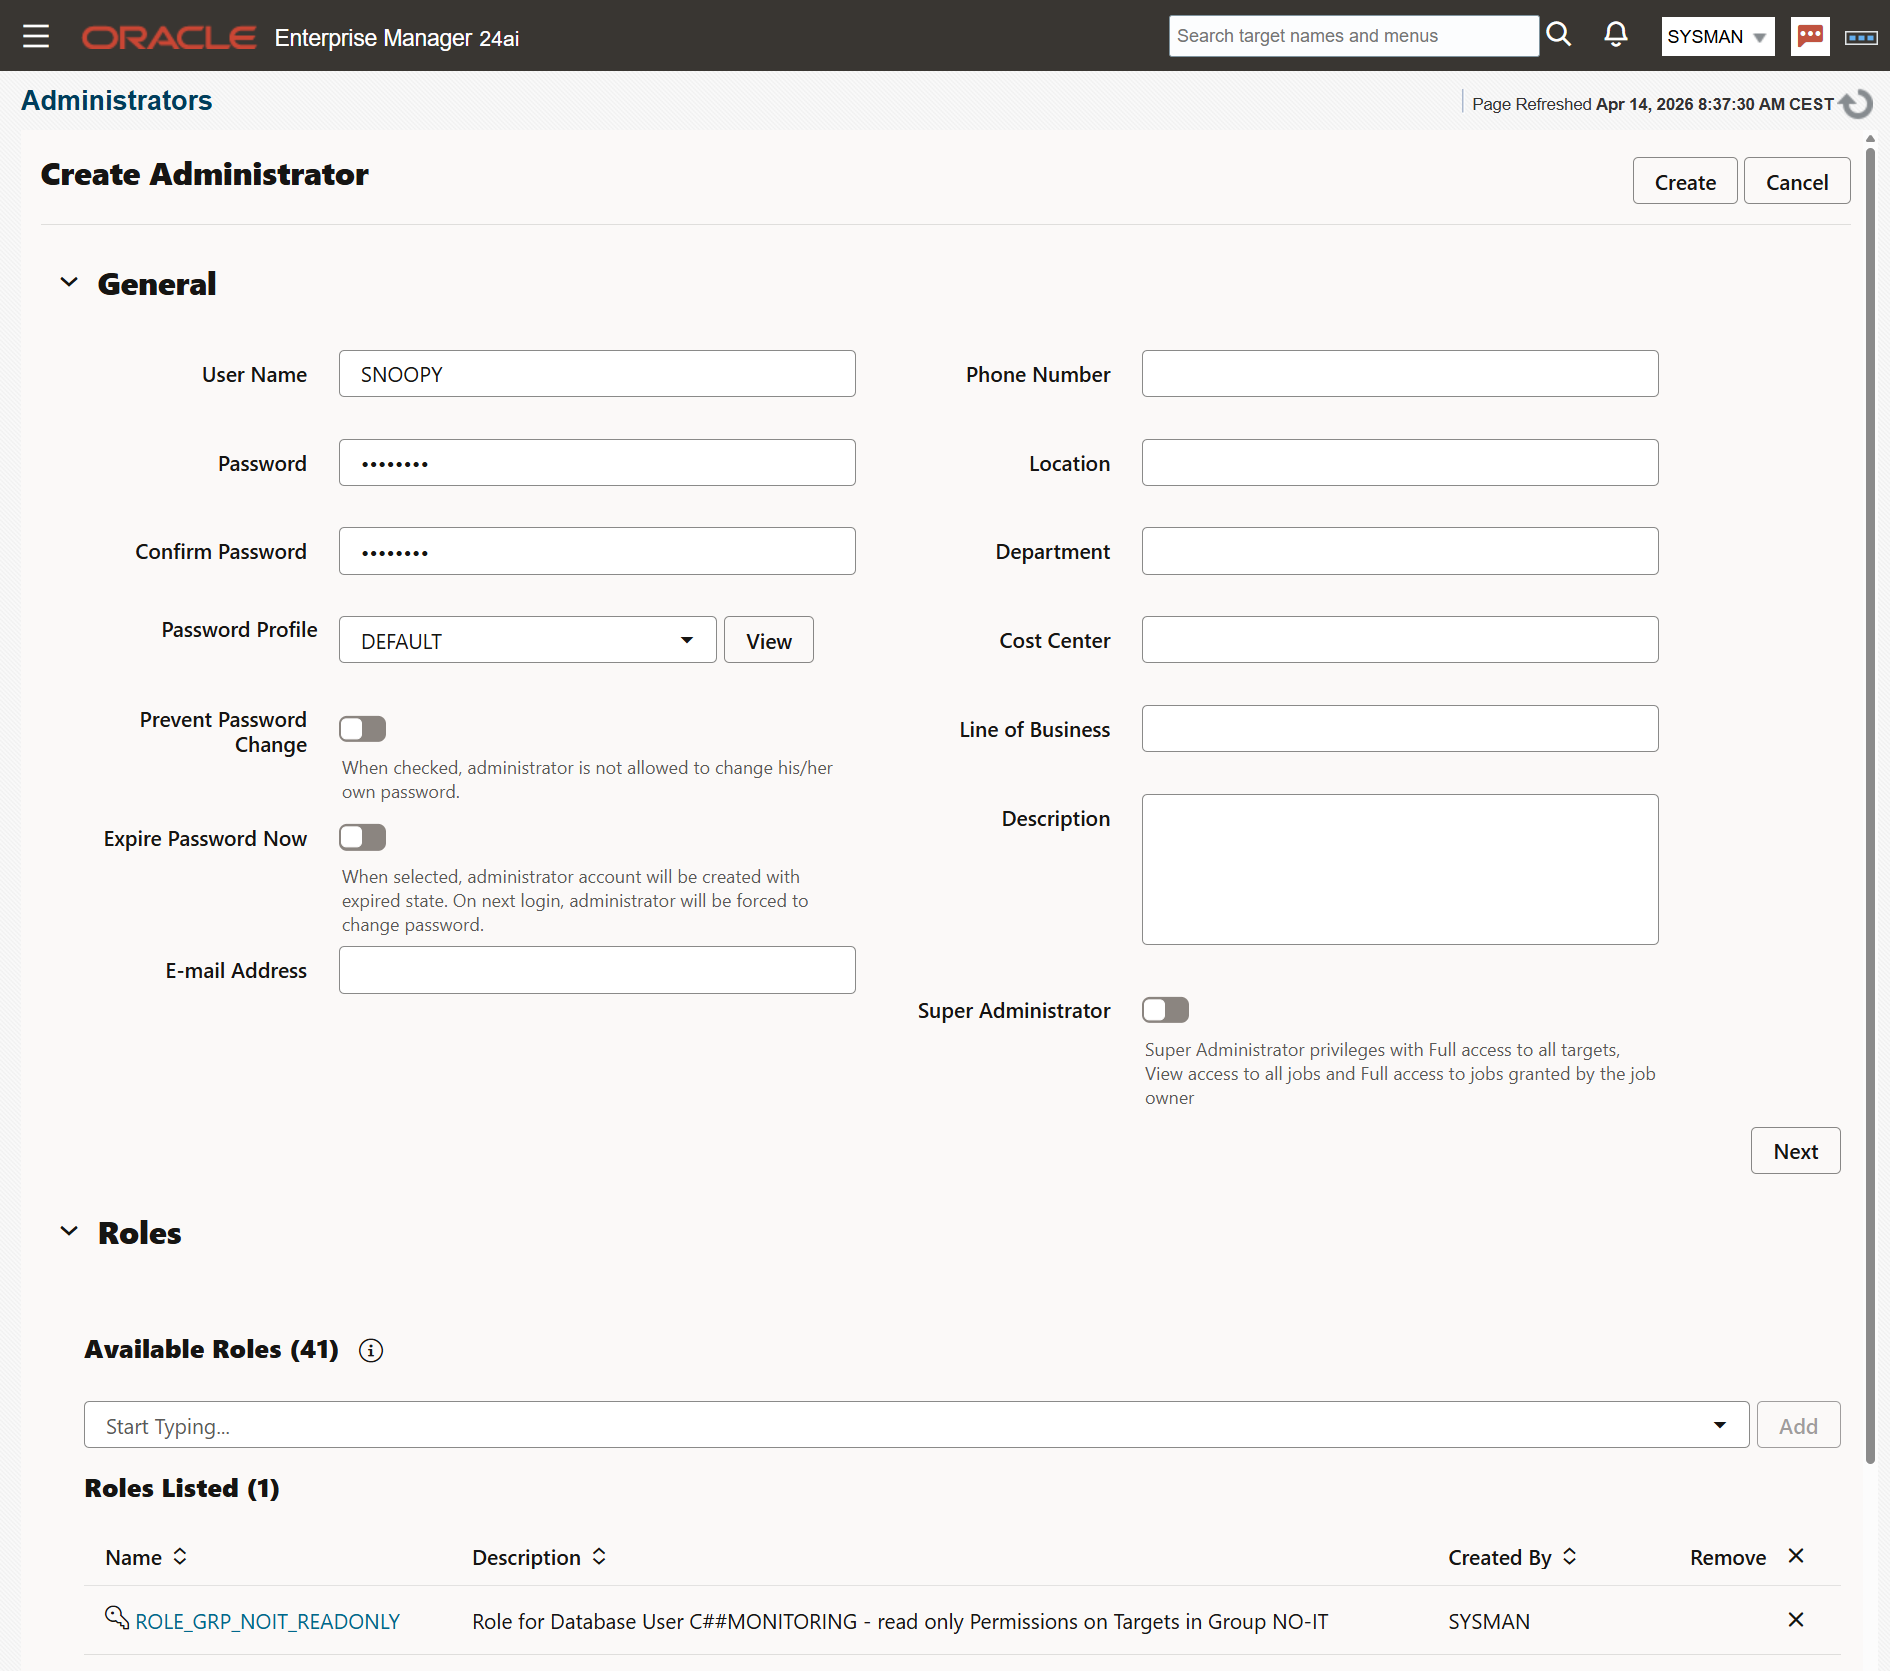
Step 7 — Create the OEM User and assign the Role
Navigate to Setup → Security → Administrators and create user SNOOPY. Assign the private role created above. Remove the predefined roles listed PUBLIC and EM_USER, they are covered in role.
Step 8 — Verification
As user Snoopy on first login, the user must set a home page. For a DBA focused on databases, the Database summary type is the most appropriate choice. This can be changed at any time.
Snoopy can only see targets aded to the group and their relation like underlying host.
Targets → All Targets.

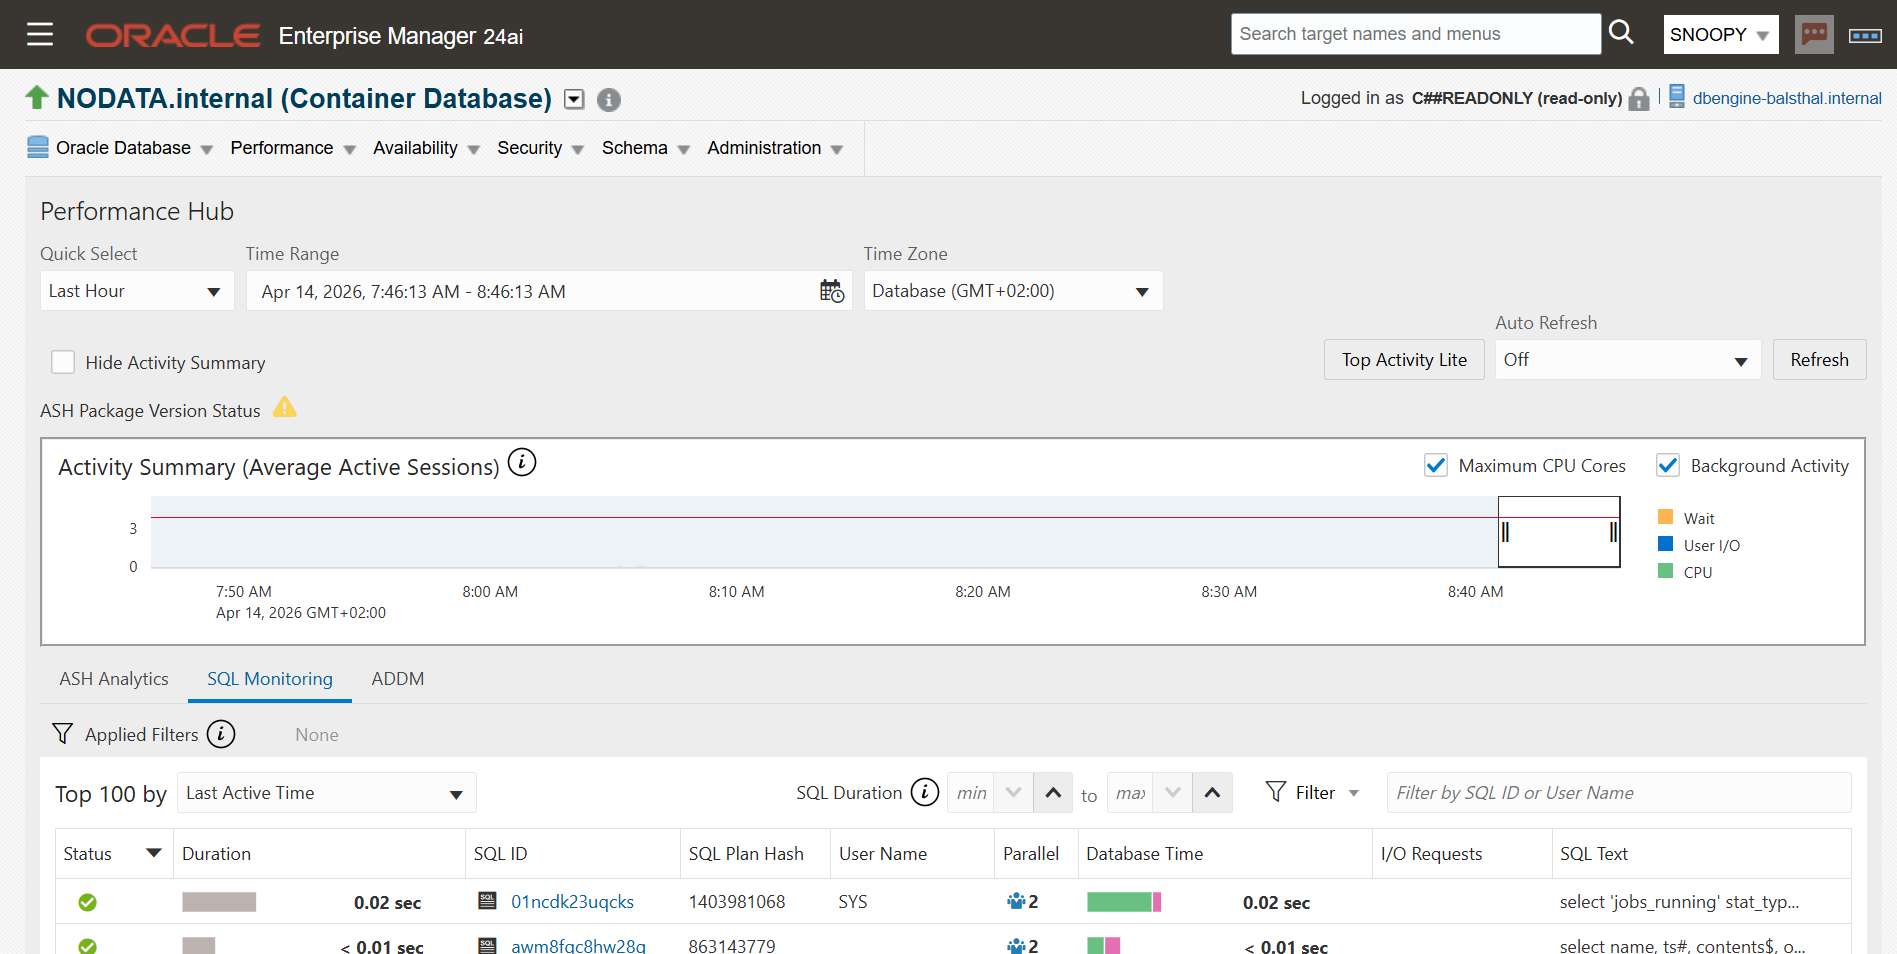
Select database instance from group. Snoopy sees performance data. Performance → Performance Hub → SQL Monitoring. The Named Credentials is filled out for direct login.
The Performance Hub dashboard is visible now. You see on top right corner the note for read-only.
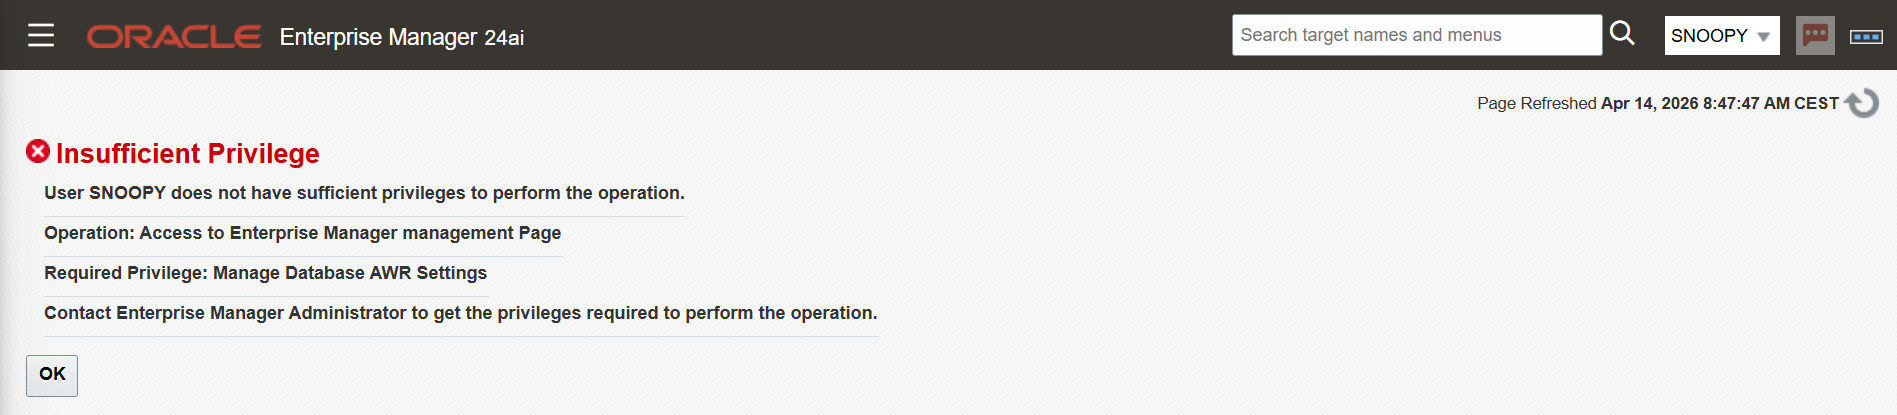
This is an error message as example when user SNOOPY wants to change the AWR retention time.
Summary
The result is a monitoring account that is constrained at both the database and the OEM layer - not just hidden behind a UI, but truly restricted by privilege. For environments with multiple compartments or teams, the same pattern scales: create one group per compartment, one role per group, and assign the appropriate roles to each user. The actions a user can see and do is completely controlled and can be adapted at any time.
Tested on Oracle Enterprise Manager 24ai.
Note: There is an alternative approach to grant the View Performance Group only to the role, then the user is prompted for his own login. The result is same: read-only permissions on target. Even when he knows the SYSDBA crendetials! Error message is same as in step 8.
Links and Notes
- Blog oracle.com: https://blogs.oracle.com/observability/enterprise-manager-monitoring-best-practices
- KB474651: EM 13c : How to Create an EM Administrator with Read Only Access to the Performance Pages of a Database Target?
- EM 24.1 Security Guide Privilege Groups: https://docs.oracle.com/en/enterprise-manager/cloud-control/enterprise-manager-cloud-control/24.1/emsec/privilege-groups.html
- EM24.1 Security Guide Control Authorization: https://docs.oracle.com/en/enterprise-manager/cloud-control/enterprise-manager-cloud-control/24.1/emsec/configuring-privileges-role-authorization.html